- The "Panorama uploaded" date for every panorama,
- "Google Earth" link (with the KML) file now opens in GE (Content-Type error),
- Link to the tutorials (autostitch, hugin and AutoPano Pro) for users who like panoramic photography but don't know how to stitch photos together,
- + few minor technical issues
2009-01-25
New version rolled out
The beta-testing phase of the new version of Panoye is now finished. There are only a few minor updates:
2009-01-16
Panoramic images with Hugin
From Wikipedia:
Unlike autostitch, hugin is a complex program with hundreds of options. In this quick tutorial I'll try to teach you only the basics of panorama-making with hugin.
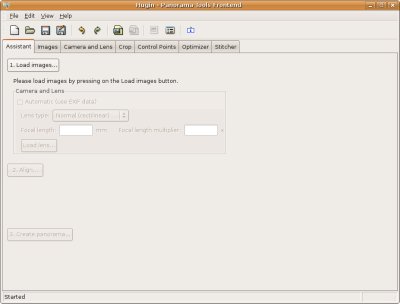
So, let's start... When you run hugin for the first time you will see something like this:
There are many different ways to stitch a panorama in hugin. I'll continue with the easiest (at least for me) path: simple manual stitching.
Click the "Images" tab:
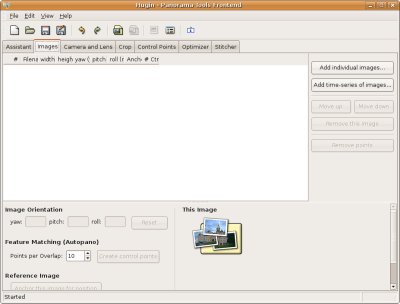
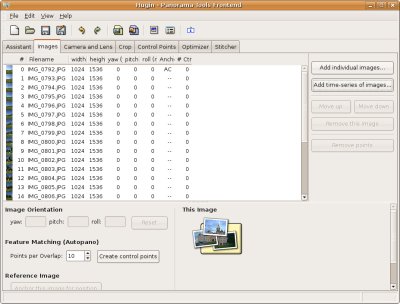
Select the "Add time series of images" button. Then select the images you made for your panorama:
Click on the "Camera and lens" tab and check if the settings for your camera/lenses are correct. It should be, if the EXIF data embeded with your digital photos are OK.
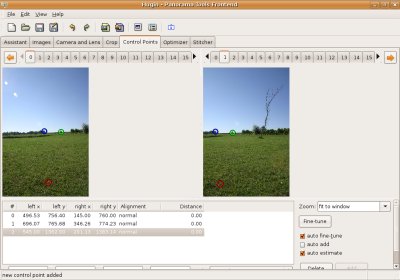
Click on the "Control points" tab:

Now you must find control points between neighbor images. At the top there is a list of all your images. We will start with the first and second. Select the "2" button on the right part of the screen, and the second image should be shown:

Now find the controll points (ie. same positions) on both images. First click on the left side, then on the same point in the second photo. The more controll points you find - the better your result will be. For this example, I tried to find three points:
After you've done for the first and second image click on the right arrow (top-right of the window) for the second and third images pair. And so on...
Note that, after you found your first control point, hugin sometimes try to guess the best point. Just double-click on your left image - and it will try to find the same position on the other side.

After you have finished with all your images - go to the "Optimiser" tab:
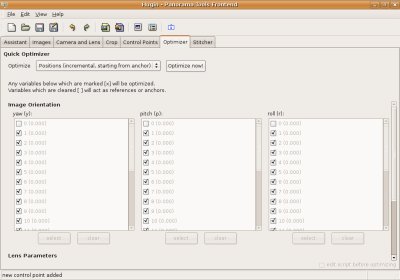
Click on "Optimise now". If everything went OK - you should see this dialog/message:
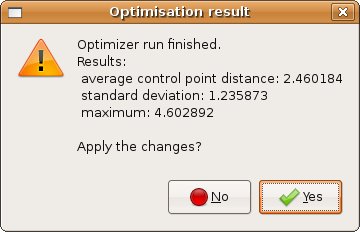
Click "Yes", of course ;)
Click on the "Preview" button in the toolbar (third from the right).
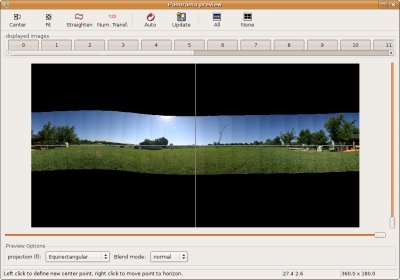
This is not the actual result, but just a quick view on how your pano will be after the stitching process. As you see, the pano is not straight. Click on the "Straighten" button in the toolbar:
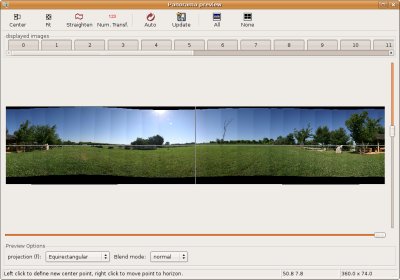
...close the preview window, and then go to the "Stitcher" tab, the last one:
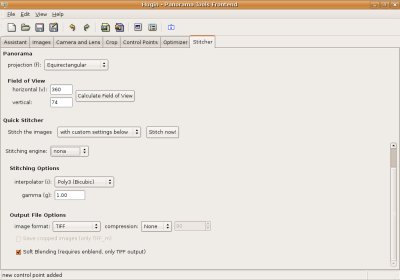
You can experiment with the options here, but most of the times - the default options should be OK. Click the "Stitch now!" button, and select the resulting file.
Open that file in a photo-editing application of you choice (here's GIMP)...

Crop the top and bottom part of the pano:

The last step is, of course... Upload and share your panoramic images on panoye! :)
hugin is a cross-platform open source panorama photo stitching program developed by Pablo d'Angelo and others. It is a GUI front-end for Helmut Dersch's Panorama Tools and Andrew Mihal's Enblend and Enfuse.
Unlike autostitch, hugin is a complex program with hundreds of options. In this quick tutorial I'll try to teach you only the basics of panorama-making with hugin.
So, let's start... When you run hugin for the first time you will see something like this:
There are many different ways to stitch a panorama in hugin. I'll continue with the easiest (at least for me) path: simple manual stitching.
Click the "Images" tab:
Select the "Add time series of images" button. Then select the images you made for your panorama:
Click on the "Camera and lens" tab and check if the settings for your camera/lenses are correct. It should be, if the EXIF data embeded with your digital photos are OK.
Click on the "Control points" tab:
Now you must find control points between neighbor images. At the top there is a list of all your images. We will start with the first and second. Select the "2" button on the right part of the screen, and the second image should be shown:
Now find the controll points (ie. same positions) on both images. First click on the left side, then on the same point in the second photo. The more controll points you find - the better your result will be. For this example, I tried to find three points:
After you've done for the first and second image click on the right arrow (top-right of the window) for the second and third images pair. And so on...
Note that, after you found your first control point, hugin sometimes try to guess the best point. Just double-click on your left image - and it will try to find the same position on the other side.
After you have finished with all your images - go to the "Optimiser" tab:
Click on "Optimise now". If everything went OK - you should see this dialog/message:
Click "Yes", of course ;)
Click on the "Preview" button in the toolbar (third from the right).
This is not the actual result, but just a quick view on how your pano will be after the stitching process. As you see, the pano is not straight. Click on the "Straighten" button in the toolbar:
...close the preview window, and then go to the "Stitcher" tab, the last one:
You can experiment with the options here, but most of the times - the default options should be OK. Click the "Stitch now!" button, and select the resulting file.
Open that file in a photo-editing application of you choice (here's GIMP)...
Crop the top and bottom part of the pano:
The last step is, of course... Upload and share your panoramic images on panoye! :)
Subscribe to:
Posts (Atom)